With the Systam Outlook Add-in, you can invite visitors to Systam Visit straight from a calendar invite. The add-in adds the invitation address of the location you pick, so you don't have to remember it.
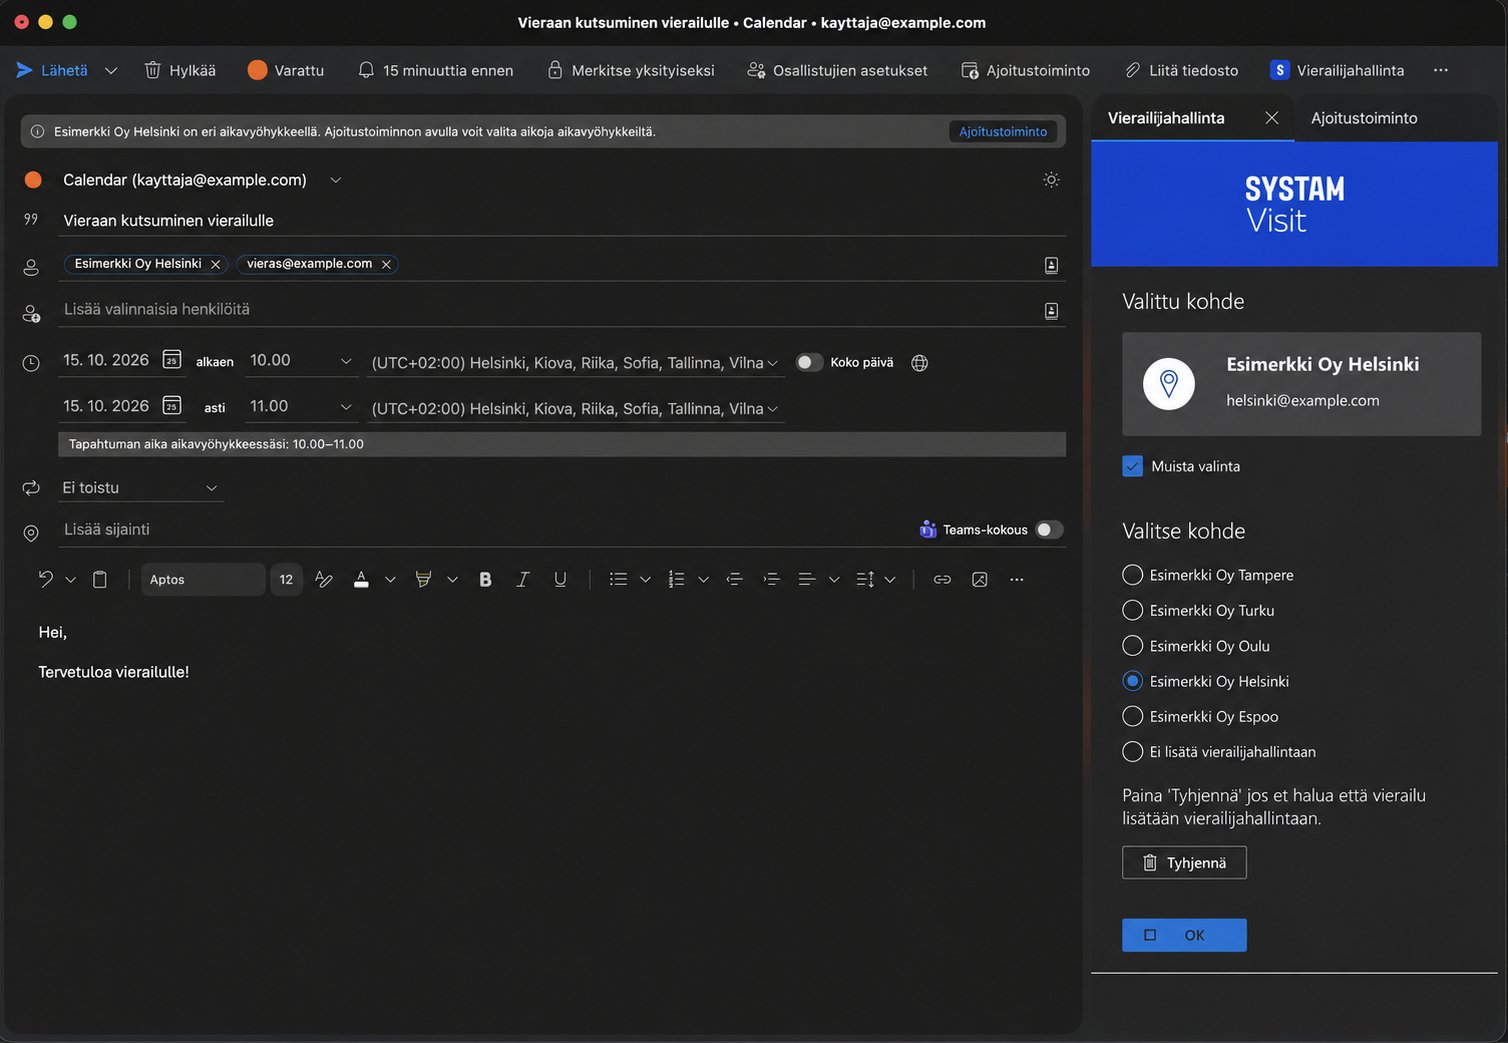
How to invite a visitor with the add-in
- Create a new calendar invite in Outlook.
- Click Systam Visitor Management on the toolbar. The add-in opens at the side of the window.
- Pick the location the visitor is coming to from the Select location list. The location's invitation address is added to the invite as one of the recipients.
- Click OK.
- Add the visitors' email addresses, the time and other details as usual.
- Send the invite.
The visit is saved in Systam Visit, and the visitor gets a pre-arrival message with arrival instructions the day before the visit.
What the add-in options mean
| Option | What happens |
|---|---|
| A location, e.g. Office Vantaa | The location's invitation address is added to the invite. When you send it, the visit is saved in Systam Visit and the visitor gets a pre-arrival message. |
| Do not add to visitor management | No invitation address is added. The invite goes out as a regular Outlook invite, and none of its details are passed to Systam Visit. |
| Clear | Removes the location you picked and its invitation address from the invite's recipients. Use it if you picked a location but don't want the visit in visitor management. |
| Remember selection | The add-in remembers the location you picked, so you don't have to pick it every time. You can change it whenever you like. |
How personal data is handled with each option
When you pick a location
The invite is passed to your organization's Systam Visit service through the location's invitation address. The service stores the time of the visit, the organizer, and the names and email addresses of external visitors. Attendees from your own organization, the invite's subject, message and attachments are not stored. These are used to send the pre-arrival message and to show the upcoming visit in the lobby.
The data is kept for the retention period your organization has set, after which it is anonymized automatically. Read more: Retention policy for visitor data.
When you pick Do not add to visitor management
No details of the invite are passed to Systam Visit. The visitor won't get a pre-arrival message and won't show up in the lobby's list of expected visitors. If the visitor signs in on site at a self-service kiosk or at the lobby, their details are saved only then, the same way as for any walk-in visitor.
When Remember selection is on
This setting doesn't change how personal data is handled. It only saves which location is preselected in the add-in. Details are passed to Systam Visit only when the invite includes a location's invitation address.
Good to know: the add-in does the same thing as adding the invitation address to the invite by hand. Read more: Inviting guests via calendar invite.
Installing for one user
- In Outlook's mail view, click Get Add-ins on the Home tab.
- Select My add-ins in the left pane.
- Under Custom add-ins, click Add a custom add-in and select Add from URL.
- Paste the manifest.xml address you got from Systam and install the add-in.
The next time you create a calendar invite, you'll see a button with the Systam logo on the toolbar.
Installing for the whole organization
- Sign in to the Microsoft 365 Admin Center and go to Settings → Integrated apps.
- Click Upload custom apps.
- Select Outlook as the Host Product and paste the manifest.xml address you got from Systam into Provide link to manifest file.
- Choose whether to deploy the add-in to the whole organization or to specific user groups.
- Accept the permissions the add-in requests and click Finish deployment.
Good to know: If you deploy the add-in to a group, the group's members must be users. Microsoft 365 doesn't support nested groups here, so if a group contains another group, the members of that inner group won't get the add-in. If you want to cover several groups, add each group to the deployment separately.
It can take a few hours for the add-in to reach all users. It appears once Outlook is restarted.
All set! You can now invite visitors right from your calendar, and the lobby knows in advance who's coming.
Was this article helpful?
That’s Great!
Thank you for your feedback
Sorry! We couldn't be helpful
Thank you for your feedback
Feedback sent
We appreciate your effort and will try to fix the article